
Abstract.
 After experimenting with the small receipt thermal printers and manage to make a portable camera, my brother came up with a very clever idea. He is organizer of a juggling convention, and he looked for a kind of funny game around beer selling and their receipt. The aim was to entertain and offer a beer every lets say 50 sold. He said we can do more than print pseudo randomly a winning ticket based on certain ratio.
The idea.
 We imagined a machine standing on a bar, with on the client side a camera pointing at you, a screen showing the camera output and few instructions. On the back side, a single button allowing the barman to launch the lottery for one ticket. What the machine do once you press the front big button (I really love these Adafruit massive buttons!), is taking a picture of you. And then there is two possibilities. If you loose, a souvenir receipt is printed with the picture of your face and a random funny quote. If you win, a winning receipt with the face of someone else is printed, and instructions telling you that if you find the random person on the printed picture, you won the right to offer a free beer to this person.
The printer.
 The printer choice should consider reliability, speed and print
quality. Even if the last one is relative to what we can expect for black or white thermal printing. I moved from the affordable and small serial Adafruit 58mm printer to a more professional one. After some non conclusive test with a cheap 80mm Chinese printer, I finally get an Epson point of sale printer. The TM-T20 is USB and commands are very well documented on their website. If not set to the maximum print speed, they could make surprisingly good prints for bitmap pictures. It depends a bit of the paper quality as well. I get very nice results with BPA-free recycled paper roll.
The system.
 Once again, the raspberry pi is a nice card and of course perfectly capable of doing such a process. There is the official camera module, even if a basic webcam would make it as well, USB ports for the printer, HDMI for a screen, GPIO for buttons and leds. But most importantly, I can reuse a lot of code form the Polapi.
The software is written in Java and uses two external libraries. One for GPIO – Pi4J and an other one for USB – usb4Java . In addition, the native raspbian program raspividyuv is used to get the camera frames. The camera output is on top of everything and always visible on the screen. The all Java software part is hosted on github. The runnable Jar file must be launch on the Raspbian LXDE environment and could be easily auto-launched. There is some logs here, but I must complete them a bit.
The case.
In the view to avoid yet another device taking dust in the garage, I made the case looks like an arcade. I just have to exchange the front panel to have a raspberry pi Mame machine ! (That will instead probably take the dust of the attic, but with style, surrounded by retro consoles)


Wood sawing


Case filling

Resulting device
Outlook.
It was quite a success on the Juggling convention, it brought fun and few free beers ! It ran smoothly without any reboot despite I expected some bugs.
Upgrade 1
I’ve worked on the code for the Port Hackathon in 2016. I’ve put another button in the front panel if you’d like to share the picture taken and printed on a Facebook album. It was used for ThePort2016 and TEDxCERN. After the countdown, a screen appears for 10 sec asking you if you want to share the picture on the facebook album or re-print the picture. The album address is printed on the tickets as well.

Upgrade 2
I recently update the code to use different printer commands. I was contacted by someone with a different printer model. Still Epson, but the TM-T88IV. It seems working fine now, and it possible more printer model can now be compatible. There is more settings now in the config file, it takes image files for the ticket header, and you can choose two different dithering algorithm.
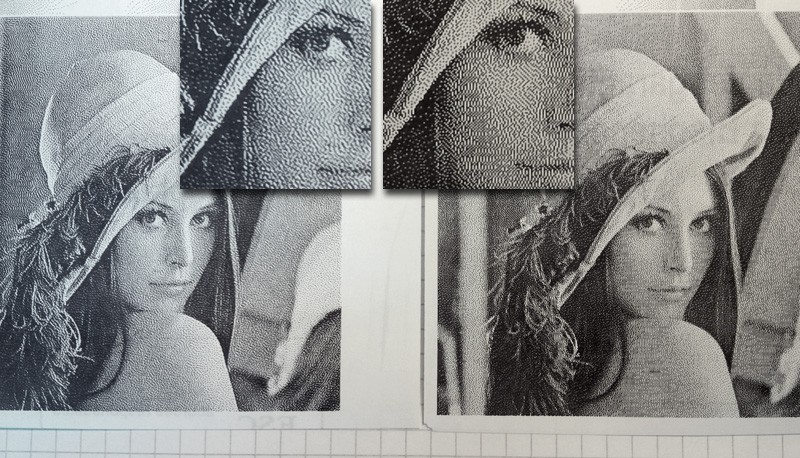
Right is the classical Floyd-Steinberg, left is the Jarvis Judice Ninke dithering (Translated in Java the nice C code from https://github.com/petrkutalek/png2pos/blob/master/png2pos.c )
Upgrade 3 : TimeScan Effect
For quite some time now, I’d like to add a creative mode on the photobooth. And I had the idea of a real-time “time scan” effect.
The idea is to apply a different time delay for each pixel of the image. For example the bottom line has no delay, and gradually up to the top line, there is more delay:

The frame rate of the video input should be quite high in order to have the full image scanned in around 3 seconds.
After exploring different solutions, I got some help directly from raspberry pi forum user 6by9. As he told me, I then derived the raspividyuv C code. And it runs rather fast. The camera acquisition is at 90 fps, the rotating buffer filled accordingly. The rendering is at around 30 fps for 15% of total cpu usage.
The code is still messy but can be found here : github RaspiVidYUV.c and the raspberry pi forum page is here: https://www.raspberrypi.org/forums/viewtopic.php?f=43&t=230926
The code uses a grayscale image to determine the time delay of each pixels, so it is not limited to a vertical scan.
For a vertical gradient :

For a circle gradient:

On the photobooth side
I started the integration with the photobooth software. And as you can imagine, I could not resist to try the Mike Szczys’s idea of generating animated gif !
The share button is linked to the booth twitter account and let you share the Gif if you want : @PhotoboothMuth


Pingback: ‘Icebreaker Game’ – Win Free Beer, Meet Random People with the Press of a Button #RaspberryPi « Adafruit Industries – Makers, hackers, artists, designers and engineers!
Pingback: ‘Icebreaker Game’ – Win Free Beer, Meet Random People with the Press of a Button #RaspberryPi - Raspberry Pi News